
There is nothing more disappointing than a bad print.
Here at PermaJet we are passionate about print quality. When a print goes wrong it can be easy to jump to conclusions or to blame one component of your workflow or another. Even worse you could just accept that the print is the best your printer can do and try editing the image to compensate.
You should never accept a bad print. With modern inkjet printers, good quality inks and papers, and good colour management there is no reason that you shouldn’t be able to get the print quality that you want. However, there are lots of components and stages to the printing process, and lots of points where things can go wrong. The checklist below will take you through most of the common problems and tell you how to cure them.
1. VIEWING
The first and most basic check you can make when you think you’ve got a poor quality print is considering how you are viewing the print. Always view a print under daylight. Take your print to bright daylight in a window or outside and let your eyes adjust for a couple of minutes before you make your final judgement.
Did you know? You can also pick up a daylight corrected desktop lamp
2. TEST AND CLEAN PRINT YOUR HEADS
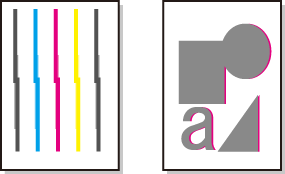
If your print has irregular stripes of missing colour then your ink heads need cleaning. All inkjet printers have some kind of utility software that allows you to print out a test pattern, check for any blockages and then run a cleaning routine. You can usually also often use the menu on the printer itself to access the same functions. Stubborn blockages can take a while to clear.
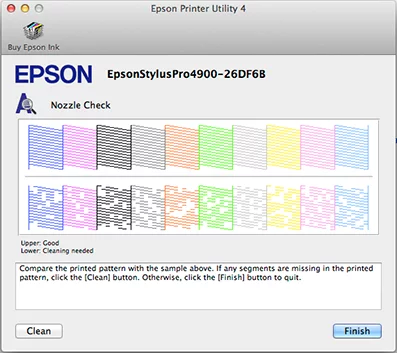
Even if the print has no missing lines but is only showing an odd colour shift then it could still be an ink head issue. One colour could be completely missing. When you look at the printed test pattern always check that each ink that the printer uses is present.
On some printers the ink head is a replaceable part and, if cleaning cannot clear it, then it may need replacing.
3. CHECK YOUR INKS
If cleaning doesn’t result in a complete test pattern then check all the ink cartridges are seated correctly. Take out each cartridge, give it a shake and put it back in. If any ink is close to running out then replace it. If you are using a bulk ink system like PermaJet’s exclusive Eco-Flo system, check the bottles aren’t empty and the tubes are full of ink.
Find out how you can save up to 80% of ink costs with PermaJet’s Eco-Flo system
4. ALIGN YOUR PRINT HEADS
Your printer’s ink head makes multiple passes across the paper building up the inks in stripes. If your print has regular stripes then it may be an ink head alignment problem. Most printers have a printer head alignment menu or option in their utility software that can fix the problem.
5. CHECK AND CLEAN YOUR PAPER
It may seem an obvious thing to check but do make sure you are printing on the correct side of the paper. Most inkjet papers are only coated on one side and ink will spread on the uncoated side. It’s usually very obvious on a gloss or semi gloss paper but can be hard to tell on a matte paper. If you lick your finger and feel the paper then the stickier side is the one with the coating. Also make sure you are actually using the paper that you thought you were and haven’t got it mixed up with something else.
Some heavier papers need to be fed in from particular trays or paper feeds and if you put the paper in the wrong place it can lead to feed problems such as banding or jamming.
Sometimes when you aren’t quite happy with a print and the image doesn’t look as good as you had hoped it may be that you are just using a paper that doesn’t quite suit the subject. Different papers with different levels of gloss or whiteness can be more suited to a subject than others.
For example, a really colourful wildlife shot may suit, PermaJet Oyster 271gsm and a monochrome long exposure landscape shot may look great on PermaJet ,Smooth Art Silk 300.
6. DOUBLE CHECK YOUR PRINTER DRIVER SETTINGS
The printer driver software installed on your computer can have huge influence on the print and incorrect settings are one of the most common causes of poor prints. The first thing to check is that you have selected the correct media type in the driver. The media type sets lots of variables such as the amount of ink printed and the height of the print heads.
You can find out which setting to use for each of our papers.
Also don’t always assume that setting the resolution or the quality to the maximum will always result in a better print. Some papers are better at lower resolutions, especially matte papers. Increasing resolution often just uses more ink for no visible improvement in print quality and can lead to puddling or spreading of ink droplets.
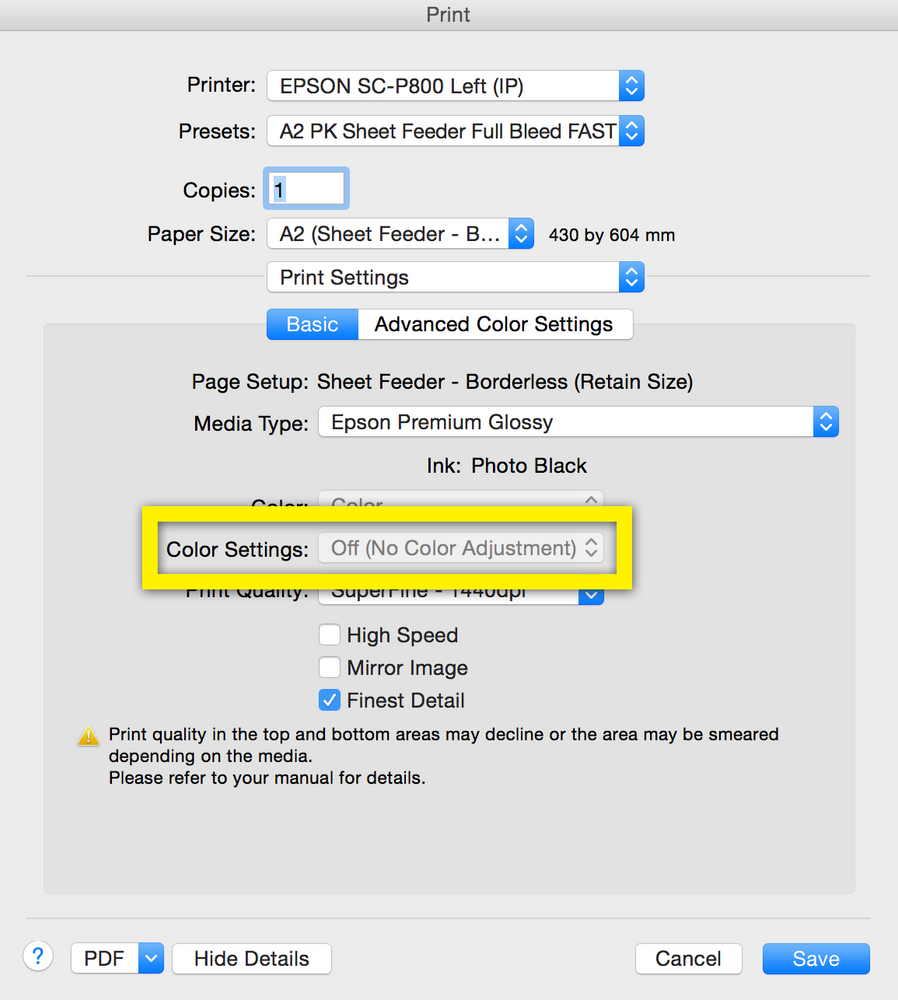
You should always use a printer profile if you want to get a good print. When you use a printer profile the printing application does the colour management so the driver colour management needs to be turned off, for example Epson printer drivers need to be set to “Off No Color Adjustment”.
7. HAVE YOU UPDATED YOUR OS, DRIVER OR APPLICATION?
Sometimes an update to your operating system, such as upgrading to Windows 10, can cause changes to the printing system. Printer driver updates may also lead to subtle differences in prints, and such updates can be required by an operating system change. Conversely if the operating system is updated and the printer driver is not updated then that can lead to problems that would be fixed by updating the printer driver.
If you feel your print quality has changed after any software update it can be worth just double checking that all the driver settings you were using are still the same. Often getting a new profile made with our free profiling service [insert link] can compensate for any change in your software.
8. ARE YOU USING THE CORRECT PRINTER PROFILE?
As stated above you should always use the correct printer profile for the paper that you are using. Relying on the default built-in colour controls of your printer driver will not get you the optimal print quality.
You can download profiles for our papers or use our Free Custom Profiling Service.
Each printer profile is created for particular printer driver settings. Foremost among these is the requirement that printer driver colour management is turned off. The printing application and the profile that will be managing the colour instead, for example Epson printer drivers need to be set to Off No Color Adjustment when you use any printer profile.
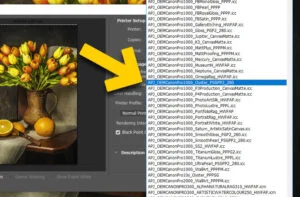
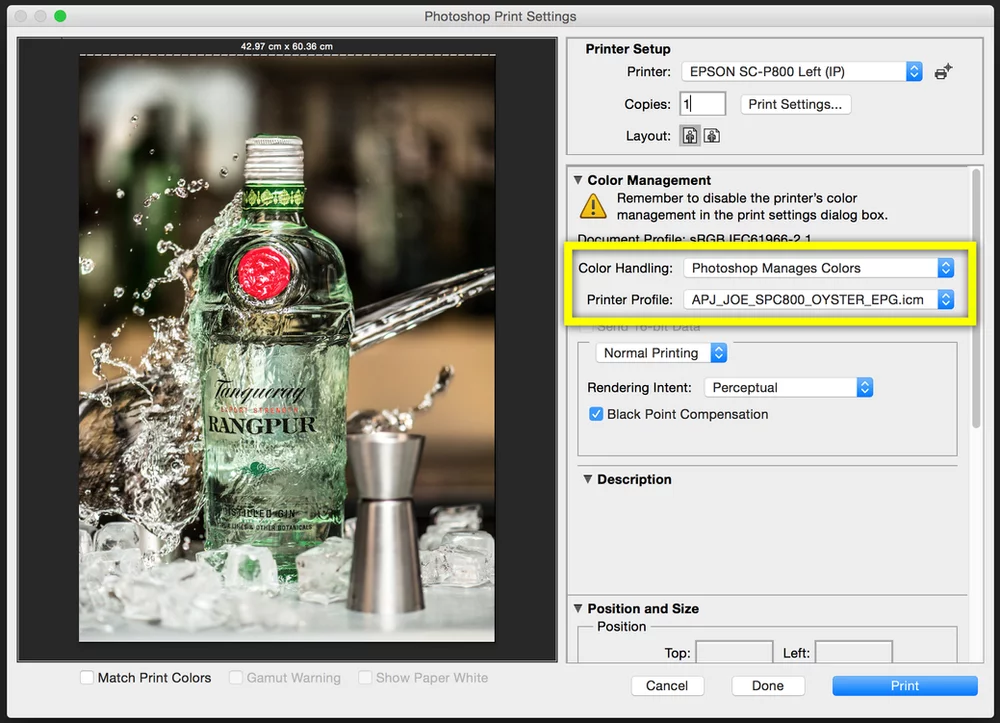
Your printer profile needs to be selected when you print from applications such as Photoshop and Lightroom. In Photoshop you need to select Photoshop Manages Colours and then choose the printer profile.
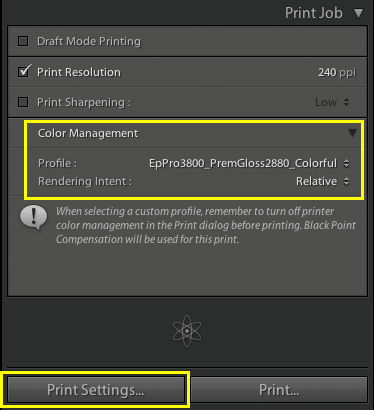
In Lightroom’s Print module you can also select your printer profile under Colour Management in the Print Job section of the panels on the right of the screen (see image, left).
Swapping the rendering intent that you are using can also make small changes to your print. You can use Perceptual, Saturation or Relative Colorimetric. If you’re not happy with the print you have done using one rendering intent, then try another.
If your print is coming out very dark and you are using older versions of Photoshop on a Windows computer it might be a problem with the printer profile version. Printer profiles can be either version 2 or version 4 of the ICC specification. Version 2 is more compatible and what we use when we make our profiles but there are certain combinations of Photoshop and Windows that require version 4. If you do get a very black print and you are using Photoshop CS3, for example, on Windows it may need that you need a version 4 profile. We can rebuild any of our profiles as a version 4 profile for you.
9. “THE PRINT DOESN’T MATCH THE MONITOR”
Your expectation of how an image should print is influenced by how it looks on your computer monitor. If your monitor has not been calibrated then it may be that the print is correct and it is the monitor that is not reproducing the image correctly. An uncalibrated, or poorly calibrated, monitor can lead you to make edits to an image that aren’t required and make the image look worse when it prints.
You can pick up a range of monitor calibration devices to suit all budgets.
One way to diagnose if the monitor is the issue is to download a test image. A test image contains a wide range of colours and tones. If a test image prints out with good neutral greys, good flesh tones and no colour cast then your printer, driver, and profiles might all be working as they should. If you look at the test print in good daylight and it isn’t close to the image on your monitor then your monitor may need calibrating.
10. IS YOUR IMAGE PIXELATED OR BLURRY?
If your image looks blurred or pixelated then it may be that the image is too low a resolution for the size that you are trying to print at. Modern digital cameras have high pixel counts and you should be able to print an A3 image, or larger, without any problems. However, if you have cropped your image or set the camera to a low resolution mode you may not have enough data.
As a general rule of thumb an image needs to be at least 240 pixels per inch at the size you want to print it at.
If your print looks a little soft and not as sharp as the image on screen then it may just need a bit of sharpening. Sometimes, especially on matte papers, the ink droplets expand a little as they hit the paper. This can soften the edges of shapes and detail in your shot. Using Photoshop or Lightroom’s sharpening function can retain more of the detail.
STILL HAVING DIFFICULTIES?
If you’ve gone through this troubleshooting checklist and still can’t get the photographic print you are after, then contact a PermaJet Print Expert by calling or e-mailing PermaJet on:
+44 (0)1789 739200 // info@permajet.com
www.permajet.com