Getting an image ready for inkjet printing is a little more complex than just selecting Print in the File menu, but it isn’t the black art that many blogs or magazine articles portray either. These three simple steps will get your image ready to print, maximise your satisfaction with the printed image and minimise the need for reprints or further editing.
PREREQUISITES
This article will deal with only the final checks and tweaks to get an image ready to print. It assumes that you have processed your raw file well on a correctly calibrated and profiled monitor and have edited the file so that you are satisfied with your image on screen. You’ve checked the histogram for exposure, done any tweaks to white balance and made any creative edits that you want to.
If you are using Photoshop then you will probably have converted the raw file to one of the three common RGB working spaces; sRGB, Adobe RGB (1998) or ProPhoto RGB. I’m not going to go into depth about which working space to use here as each has their pros and cons. The only thing I will say is that as far as inkjet printing is concerned the most important factor is that you select a working space that is larger than the colour gamut of your printer, so that you get all possible colour from your image onto the paper. sRGB is significantly smaller than the range of colours possible on a modern inkjet with a good gloss or semi gloss paper. Even Adobe RGB is smaller than a printer’s colour space in a few areas. The only one of the three that is larger than any printer colour space is ProPhoto RGB. That said, changing your working space isn’t something to do lightly so before you decide which to use do plenty of research. A lot depends on the papers you use and the colour content of your images.
Inkjet printer drivers work only in RGB so you do not have to convert your file to CMYK.
1. RESOLUTION
Digital images are made from pixels and the amount of pixels an image has is called its resolution. Your image needs to have enough pixels to print at the size that you want. Image resolution is usually expressed as pixels per inch (PPI). Higher PPI values mean higher resolution and more image detail. With modern DSLRs or even camera phones you usually have high resolution images and so you will find you can produce large prints with plenty of detail. Of course if you severely crop your image then you may still have issues but generally you’ll be fine whatever size you want to print. The effective PPI of your image will reduce the larger you print but with a larger print you view it from further away so you can get away with it.
Even camera phone images these days can be printed to A3 at acceptable resolutions. The only thing to check when printing is that you have at least 180 PPI for a large print (bigger than A3+) and around 240-300 PPI for anything smaller. However, you can get away with less depending on the image content and viewing distance. It doesn’t matter if you have more pixels than you need and the resolution is 500 PPI or more.
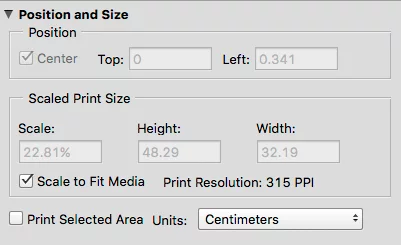
Photoshop shows you the Print Resolution in the print dialogue box when you print. The screenshot below shows the PPI of a 24 megapixel image printing onto A3+ paper. 315 PPI is plenty. If I printed the same image onto A4 the PPI would increase to 523 PPI, but that doesn’t matter. When you print an image the pixels are interpolated into dots onto the printer. This is a mathematical process that takes the original pixel values and translates them into a matrix of dots for the printer. The dots per inch (DPI) of the printer is separate to the PPI of the image and the two don’t have to match.
Lightroom allows you to set a Print Resolution (240 PPI is the default) or if you leave the option unchecked (see image below) it will use the full resolution of the image and this is usually best. By going to Show Guides in the View menu and then View/Guides/Dimensions you can see what actual resolution the image will be prior to interpolation by the printer driver.
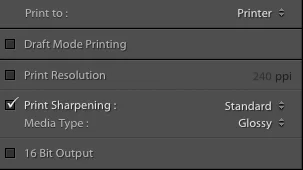
You don’t have to change the image resolution (resample) in Photoshop before you print or set a print resolution in Lightroom. It’s best to leave the resolution of the image as it is and let the interpolation occur only once when you print. Printer drivers are very good at interpolation and there is a lot of maths that goes into the creation of the printer dots and it makes sense to give the printer driver as much information as possible. If you change the image resolution in Photoshop manually, prior to printing, then interpolation is done twice and this is not recommended. The only exception might be if you are sending the image to a lab to print and you want to minimise the file size and so resampling to the print size and setting a PPI in the range of 240-300 PPI might make sense.
2. SHARPENING
Image sharpening is one of the hardest image editing techniques to master but also one guaranteed to make your prints stand out. Sharpening is necessary for every digital image to correct for the camera’s anti-aliasing and demosaicing functions, as well as lens defects. Every raw file processor applies some level of sharpening, even if you are not aware of it. Sometimes shots can benefit from tweaking this initial capture stage sharpening, depending on the image content. For example nature photography often benefits from slightly more sharpening to bring out detail in fur or feathers.
Once the image has been sharpened so it looks good on screen it doesn’t mean that it will print as sharp as it looks on your monitor. The pixel interpolation detailed above, the more limited dynamic range of the print and the physical spread of the ink on the paper can introduce a slight softening of detail which it is worth correcting for if you want the best possible print.
Sharpening techniques and controls differ depending what software you use, and the amount that you sharpen an image depends a lot on the detail in the image, the printing resolution and even the paper that you are printing on; matte papers tend to print softer images than gloss papers for example. Sharpening for print is also very difficult to judge on screen and I usually copy a portion of the image, such as the eyes and mouth in a portrait, and print it at the same scaling factor and resolution as I’ll use on the final print. I’ll make sure it prints in one corner of the paper. I’ll then go into my sharpening filter or controls and apply some sharpening and then print again on the same piece of paper rotating the sheet so it prints away from the first attempt. That way you can usually get four test prints out of a single sheet if you are careful.
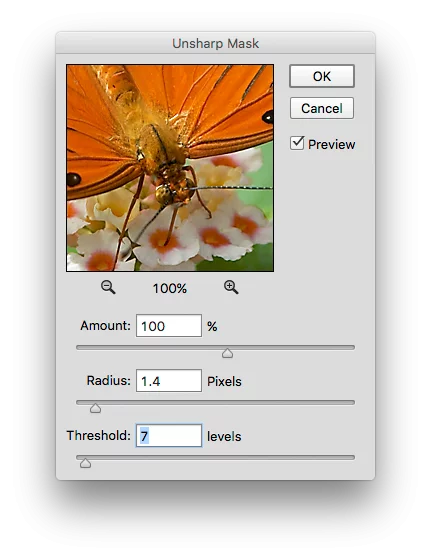
Sharpening can enhance detail and contrast in an image, but it is difficult to master.
Sharpening works by enhancing contrast around edges in your image. For example the difference between pupils and white of the eyes or detail in fur or grass. The normal sharpening controls you are given are Amount, Radius and Threshold or Masking. Amount determines the level of extra contrast. Radius determines how many pixels around the edge are affected. Threshold or Masking determines how different pixels need to be to be considered for sharpening.
The balance between these controls that you need to sharpen your image depends on too many factors to give any recommendations. Simple trial, error and experience is the only way you can get the right level for any particular image and print. However, in Photoshop do make sure you create a copy of the image or a copy of the background layer and sharpen that and not the original in case you over do it. Also if you don’t get it right the first time undo or step back in the history so you don’t try and re-sharpen an already print sharpened image.
3. SOFT PROOFING
The final step before printing is soft proofing. Normally the colours that you see on your screen are created from the RGB pixel values in the image being converted through your working space profile and then to the monitor profile so that you see the image accurately. When you print you will of course be using a profile for your printer and paper type. The printer will not have the same colour space as your monitor and some colour shift will occur. With good profiles and papers the shift is usually small but it you may still feel the need to tweak the image so it prints more to your taste.
You can download the generic profiles for our papers or we offer a FREE printer profiling service.
Both Photoshop and Lightroom allow you preview how the image may print. This is called soft proofing. In Photoshop you can go to the View menu and Proof Set Up and then Custom. You can the select the printer profile for your paper, the rendering intent that you will be using, and also check the option for Simulate Paper Color. The image on screen will then change. The RGB pixel values are now being converted from the working space profile to the printer profile and then to the monitor profile. This will give you a more accurate idea of how the final print will look.
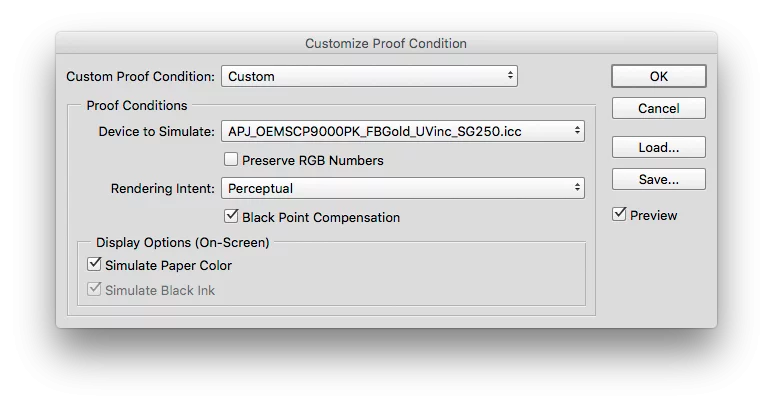
Soft proofing in Photoshop allows you to preview how colours will print.
If you click OK then the soft proof will still be active and you can create adjustment layers to do small changes to brightness, contrast etc if required. You can also Save soft proof set ups for the papers that you use.
With the soft proof active you can also use the Gamut Warning function (also in the View menu) to see what colours in your image are out of gamut (i.e. no outside the colour range of the printer). You don’t need to edit the image so that everything is in gamut because the profile conversion process as you print will do that for you but you can use the gamut warning to help inform your choice of paper type. If you are printing an image with bright colours onto a matte paper, for example, and you see that large areas or out of gamut then you may decide to use a gloss paper with a wider gamut for that particular image.
In Lightroom go to View/Softproofing/Show Proof. Then you’ll see on the right, below the histogram you can select your printer profile, rendering intent and paper simulation option. You can even use Create Proof Copy to duplicate the image for further editing.
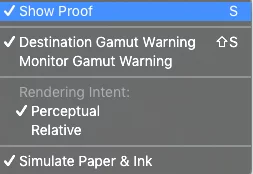
Lightroom has good soft proofing functions. You can see how an image will look before you print, saving you both ink and paper.
If you prepare an image correctly for printing you will be much happier with the result and also use less ink, paper and time on reprints that could be avoided. If you need help with printing images then check out other articles on this blog or get in touch if you need advice from our experts.
#paper #photography #ICCProfiling #printers #technical #Photoshop #Lightroom #resolution #sharpening #softproofing #RobGriffith


