
Preparing images for print is a vital step if you want your photos, artwork, or designs to look their very best on paper. In this guide we’ll give advice on understanding image resolution, choosing the best file format, and preparing files in Photoshop. Following these recommended steps will ensure you achieve professional quality results.
Understanding Image Resolution for Printing
One of the first steps in preparing your images for print is checking the resolution, as this directly affects how sharp and detailed your final print will appear.
Resolution is measured in PPI (pixels per inch), which indicates how many pixels are packed into each inch of your image. The higher the PPI, the more detail your print will retain. If the resolution is too low, the image may look soft or pixelated once printed – especially when viewed up close.
For most standard-sized prints, 300 PPI is considered ideal for crisp, professional-quality results. For larger prints, such as posters or banners, 150–200 PPI is typically sufficient, as they are usually viewed from a greater distance where fine details are less critical.
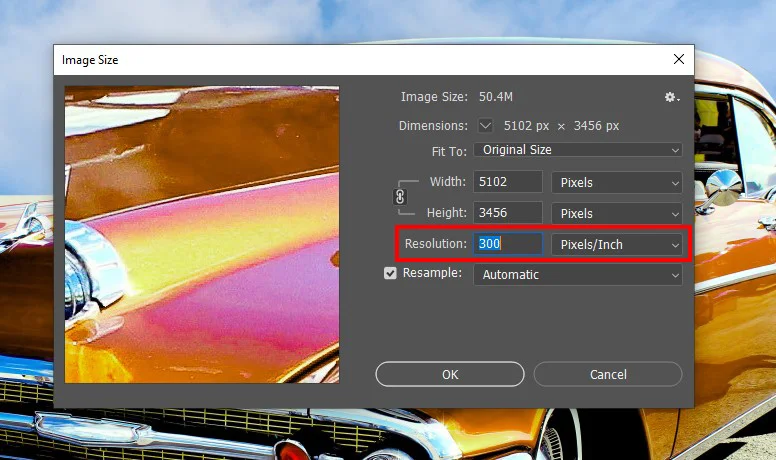
You can check the PPI of your image in Photoshop by going to Image > Image Size… and then checking the ‘resolution’. This can be scaled up or down to suit the size you’re printing at.
How to Resize Images for Printing Without Losing Quality
Resizing should be done carefully to preserve detail and proportions. In Photoshop, you can:
- Open your file.
- Go to Image > Image Size.
- Check Resample if you need to adjust the pixel dimensions.
- Keep Constrain Proportions enabled to prevent distortion.
- For enlargements, select Preserve Details 2.0 to minimise quality loss.
- Adjust the number under ‘resolution’ to alter the PPI.
If you prefer alternatives to Photoshop then Lightroom, Affinity Photo, or AI-based tools like Topaz Gigapixel AI are excellent options.
Choosing the Best Image Format for Printing
The file format can have a direct impact on print quality. Popular file formats are:
- TIFF: Considered the gold standard for professional printing because it uses lossless compression, ensuring every detail is preserved.
- JPEG: Widely accepted for print and can deliver excellent results when saved at the highest quality settings.
- PSD: Photoshop’s native format. Keeps all your editing layers intact but typically needs to be flattened before printing.
Colour space is equally important when printing your images. When editing, make sure you work in the colour space Adobe RGB (1998) for the best results in print. This is because it has a wider colour gamut than sRGB.
For more in-depth information on this, we have a blog about Adobe RGB vs sRGB.
Sharpening an Image for Print
Digital files often lose a touch of their perceived sharpness when transferred to paper. This is because the printing process can soften edges and fine details due to the ink spreading slightly on the paper. By applying a controlled amount of sharpening, you can counteract this effect and restore crispness, ensuring your printed images look as detailed as they do on screen.
Tips for effective sharpening before printing:
- Work on a copy of your file: Always sharpen a duplicate version of your image to preserve the original.
- Sharpen at the final print size: Resize your image to its final dimensions and resolution before sharpening.
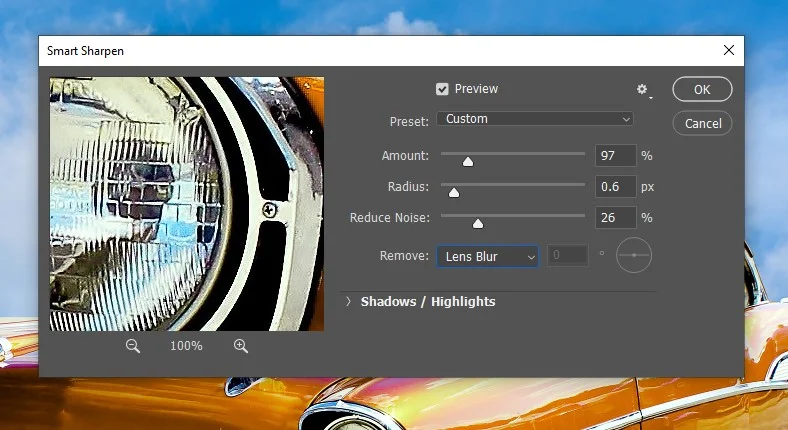
- Use the right tools: Most editing software includes tools like Unsharp Mask or Smart Sharpen (Photoshop) and similar features in Lightroom or Capture One.
- Avoid over-sharpening: Excessive sharpening can create haloes and unnatural textures. Zoom to 100% to assess the effect but also check the full image view for overall balance.
- Consider the paper type: Matt and fine art papers often need slightly more sharpening than glossy papers due to their more absorbent surfaces.
Applied carefully, sharpening ensures your prints retain lifelike clarity and detail, making them stand out whether viewed up close or from a distance.
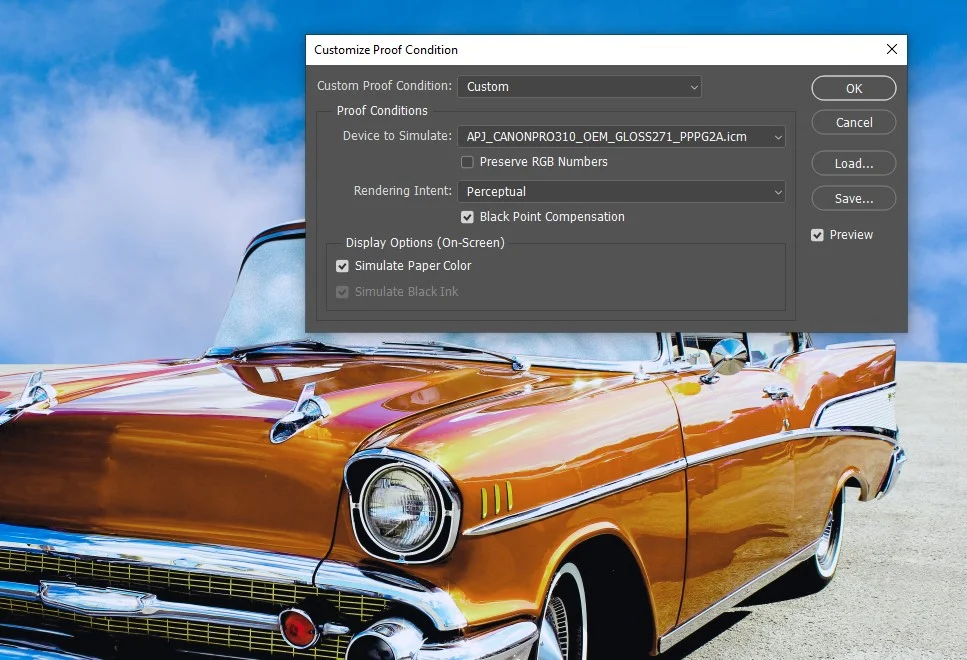
Soft Proofing: Matching On-Screen to On-Paper
Soft proofing is a way of digitally simulating how your print will look. This can be a useful way to make sure your images look as intended before printing, avoiding wastage of paper and ink. However, it should be used with caution as a digital screen will never look identical to a print.
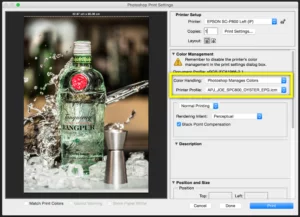
To produce a soft proof in Photoshop:
- Go to View > Proof Setup > Custom.
- Choose the appropriate PermaJet ICC profile.
- Enable “Simulate Paper Color” and “Black Ink” to see how your chosen paper may affect the image.
This allows you to fine-tune brightness, saturation, and contrast so the printed result matches your expectations as closely as possible.
Avoiding Common Mistakes
Many print issues can be avoided with a few best practices:
- Don’t use low-resolution files – always match resolution to print size.
- Use the correct colour profile for your printer and paper.
- Avoid over-editing, as excessive sharpening or saturation can look unnatural in print.
In Summary
Successful print preparation is about balancing quality and practicality. Always start with the right resolution and choose your file format carefully. Resize images with tools that preserve detail and consider soft proofing with ICC profiles to ensure accurate colour. By following these steps and avoiding common mistakes, you can create prints that look just as impressive on paper as they do on screen.
FAQ’s
How to prepare an image for printing?
Check resolution, choose the right colour profile, resize correctly, and export in a suitable format.
How can I improve the quality of a photo before printing?
Sharpen, adjust colours, upscale carefully, and soft proof.
What’s the best image format for printing?
TIFF for maximum quality, high-quality JPEG for everyday printing.